CREATE COVER PAGE SECTION (Updated)
This section allows the user to design their own cover pages. Cover pages are assigned to exercise programs in the Prepare Program tab of the Create Programs page.

Create a New Cover Page
Click the Create Cover Page button in the Manage Cover Page section

Edit an Existing Cover Page
Click the Edit icon in the operations column of any existing cover page in the Manage Cover Page section

Cover Page Design Process
1. Name the cover page – Add text to the Name field
2. Set as Default if desired
3. Design the cover page – Add text and images to the field to create the cover page that is desired. Use the available editing tools to create the design you want. Design must fit within the confines of one page. Ensure images are minimised (<100KB), this assists with the speed of exercise program generation.
4. Save/Update to save changes

To Assign a Cover Page to an Exercise Program
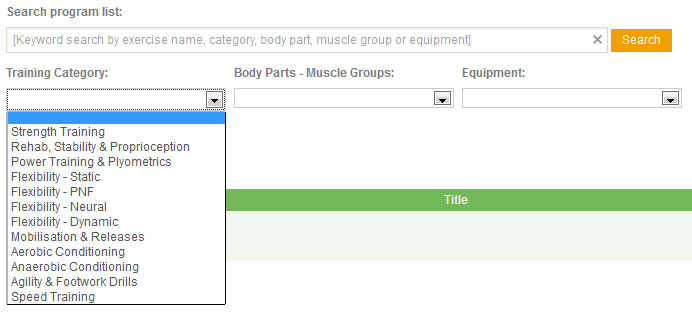
Select the desired cover page from the dropdown menu in the Prepare Program section of the Create Program section. Ensure PDF On is selected. Generate the Exercise Program and ensure Cover Page layout is as intended.

COVER PAGES SECTION (UPDATED)
This section allows the user to design their own cover pages. Cover pages are assigned to exercise programs in the Prepare Program tab of the Create Program page, or printed direct from the Create Cover Page page

Create a New Cover Page
Click the Create Cover Page button at the top right of the screen

Search Cover Page List
Search the Cover Page list by searching the list by cover page name

Page Icons

Edit, Duplicate, Delete Functions

Edit an Existing Cover Page
Click the Edit icon of any existing cover page

Duplicate an Existing Cover Page
Click the Duplicate icon in the operations column of any existing cover page. This preserves the original and allows you to edit the duplicate copy

Delete an Existing Cover Page
Click the Delete icon in the operations column of any existing cover page. This permanently deletes the cover page from the list

MANAGE PAGE HEADERS SECTION (updated)
This section allows the user to design their own page headers.  Page headers are assigned to exercise programs in the Prepare Program tab or the Create Program section.

Create a New Page Header
Click the Create Page Headers button at the top right of the screen

Search Page Header List
Search list by page header name

Page Functions

Edit, Duplicate and Delete functions

Edit an Existing Page Header
Click the Edit icon to open the page header for editing

Duplicate an Existing Page Header
Click the Duplicate icon. This preserves the original and enables you to edit the duplicate

Delete an Existing Page Header
Click the Delete icon. This permanently deletes the page header from the list

Manage Forms Help

Manage Video Help

CREATE OR EDIT EXERCISES SECTION
This section provides access to individual Exercise information.  From here exercises can be Created, Edited, added to Favorites list and Hidden. Create a New Exercise
Click the Create Exercise button in the Manage Exercises section Edit an Existing Exercise
Click the Edit icon of the appropriate exercise in the operations column of the Manage Exercises section

Exercise Creation & Editing
Each exercise has information listed under 3 tabs.  This information is used to identify, find and present the exercise.

Name & Classification
This information is used to find the exercise in the exercise collection.  Ensure exercises are named and classified in a logical manner, similar to the original collection. 1. Name the Exercise  name fields (2 parts) will be separated by a hyphen. For example Push Up – Exercise Ball
2. Select appropriate Training Category
3. Add Keywords  list training sub types, individual muscles, commonly used exercise names and words to quickly identify the exercise
4. Select appropriate Body Part & Muscle Groups
5. Select appropriate Equipment
Tab 2 – Settings & Descriptor
This information acts as the default setting for the exercise. This information can be edited once the exercise has been added to an exercise program. 1. Add values for Sets, Repetitions, Rest & Load
2. Select Output format  This is the sentence structure used when exercises are printed in picture format
3. Write appropriate exercise description (use existing exercises as a guide)
Tab 3 – Media
Image files will print as part of the exercise program whenever appropriate Print Layouts are chosen.
To Add media. Browse to locate the file, click Open
Assign a Key  This describes the file to position the image for print
– ‘Start’ position at beginning of exercise
– ‘Finish’ – mid point or finish position
– ‘Grid’ – diagram representing exercise
– ‘Video’ – video file of exercise

Click Add file Recommended media file sizes
Large file sizes slow exercise search, exercise program generation and printing.   Please ensure all files are minimal size.
Image Files – Less than 50KB file, approx 300×300 pixels is sufficient
Video Files – Less than 1MB file, 1 repetition of the exercise is sufficient

MANAGE EXERCISES SECTION
This section is used to refine and explore the exercise collection. This includes viewing exercises, editing exercises, creating new exercises, selecting exercises as Favorites and Hiding exercises.
Page Operations

Create a New Exercise
Click the Create New Exercise link to enter the create exercise sectionSearch the Exercise Collection
To refine the exercise collection search by keywords or use the drop down menu

exsearch

 Search Tips1. Try widening your search by using only the dropdown menus. Make only one or 2 selections and click Search
2. Use the same keywords (or part of the words) that appear in the dropdown menus
3. Keywords – Exercise names, category, body part, muscle group and equipment can all be used as keywords
4. From the Exercises window click the star icon to make any exercise a favorite. Favorites always display first in search results

Page Icons

Edit  Only exercises that are not shared can be edited.  If you wish to edit an exercise (eg. Change an existing exercise name). First, duplicate the exercise, then edit the duplicate. Do not share this exercise, if desired hide the original exercise. View  Any exercise can be viewed by clicking the ‘V’ – View icon Duplicate  Any exercise can be duplicated and then edited Delete Only exercises that are not shared can be deleted. Simply click the delete icon.  To remove shared exercises from search results, opt to Hide these exercises.  Share  (Function on hold) – Any exercise you create can be submitted for sharing by clicking the green icon.  All exercises submitted for sharing need to be approved by the site editor. Once approved the exercise will be available to other users.   At this point you are no longer able to edit or delete this exercise.   You will need to duplicate it, before editing. Favorites – Click the star icon to add an exercise to your favorites list. Favorite exercises present at the top of the exercise search list and are generally faster to find. Hide Exercises  Marking exercises as Hidden means they will not appear in the Exercises section when searching for exercises.  This function speeds up the search process.

CREATE & EDIT CLIENTS SECTION
This section allows new clients to be created and client information to be edited. This includes contact details, personal information, attachments and exercise program history Create a New Client
Click Create Client button on the Manage Clients page

Edit an Existing Client
Find the client on the Manage Clients page, click the Edit icon

Create or Edit Client Information
This section is split into 4 tabs

cr_cl_ops

Tab 1 – Client DetailsEnter text into fields. Name fields are only mandatory fields
Click Save/Update to Save Changes

Tab 2 – History & Goals
1. Click Create to add a new note
2. Enter text into Medical/Exercise Info field
3. Format as desired
4. Click Save/Update
Notes will be stored in date order

Tab 3 – Attachments – Associate files with the client 1. Click Add File
2. Click Browse & select file for upload
3. Add file description if necessary
4. Click Update/Save to upload file
Tab 4 – Exercise Programs
Create a new program by clicking CreateDelete a program by selecting it and clicking DeleteAdd to Template/Client’s List Select a program to move from one list to the other. Click Add to Template/Client’s List
Manage the client’s exercise program history using the operations icons edit, duplicate & delete
Click Update to save changes

MANAGE CLIENTS SECTION
This section is used to access and manage the Client list. This includes adding new clients and editing existing. This section is also used to Export and Import client details.

Create a New Client
Click the Create Programs button and enter required information

Search the Client List
To search the Client List, enter a full or part client name, or use the available filters

Export Client Records
– Select a clients record, or multi select records using the checkbox on the left side of the list
– Click Export to create a CSV of this information
– Open the CSV file to view the information

Import Client Records
Prepare the data for import
– First, select a client record, and click Export. Use the exported CSV file as a template to collate and organise the client data you plan to import.
– Arranged source data into the format and order of the CSV, otherwise it will not import.
– Save the source data as an Excel file, CSV format (or similar CSV format)
– Up to 2000 records can be imported in a single action

Import Client Data
– Click the Import file icon, adjacent to the Import button and select the source CSV file
– Click Import button. Import process will take 5-30s, see confirmation message
– Any problems with the import, please email us and we will troubleshoot for you, most import issues relate to the structure and content of the imported file

Tip – Client data is matched based on Client email address.
– If the Client record already exists, other fields will be updated with (any) new information.
– If the record does not exist, a new client record will be created

content for global search help

Contact Us

Get client app